In this article, we will explore two different approaches to adding integrations to an application, using Hubspot as an example. We’ll first go through writing a minimal example of an app capable of:
- Retrieving access and refresh tokens through OAuth2
- Getting fresh access and refresh tokens using the provided refresh token
- Retrieving contacts available in Hubspot.
All the code used in this article can be found here: https://github.com/chift-oneapi/hubspot_example
Objectives
By the end of this article, you will be able to:
- Implement a minimal example of OAuth2 authentication and information retrieval from Hubspot
- Implement the same scope with Chift’s unified API
- Explain the pros and cons of using a unified API over a traditional integration
Getting ready for the implementation
For following this section, you will need:
Once both accounts are in your possession you can move to the next section where we will create an app, allowing us to get the necessary information for OAuth2 authentication.
Creating your Hubspot App
Creating an app for Hubspot can be done in a few quick steps. It is fairly easy to configure as you wish but for the sake of simplicity, we will focus here on the mandatory parts of the process.
Access your developer account and proceed to the Apps page. From there, click on the "Create app" button and get started.
First we set the mandatory app name:
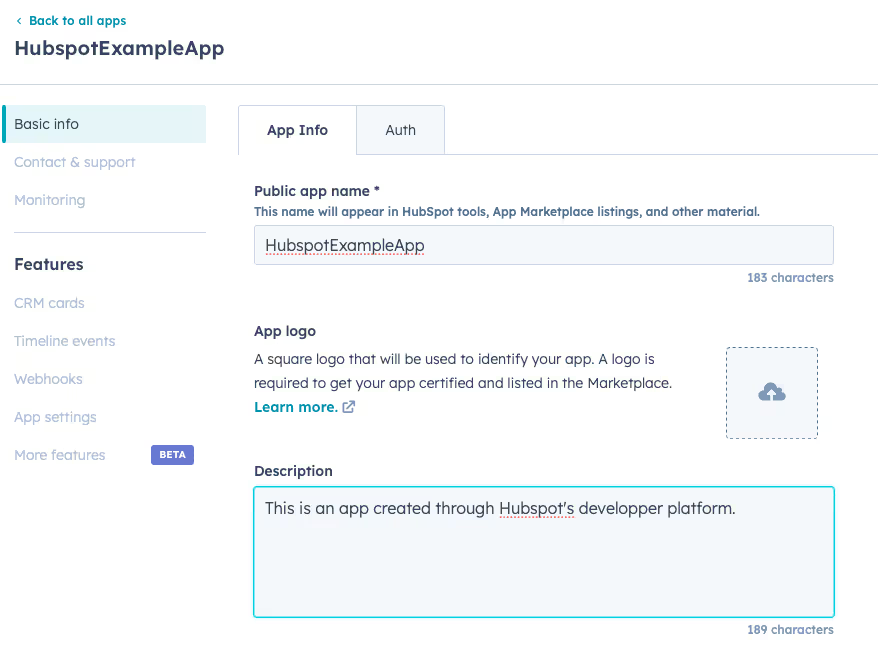
Then we choose the scopes accessible by token we will generate during the OAuth2 process. Here we will need three scopes:
%%oauth%%: selected by default and enabling OAuth2 for this app%%crm.objects.companies.read%%: Enables us to have read-access on companies objects%%crm.objects.contacts.read%%: Enables us to have read-access on contacts objects
Your scopes should look like this:

Then we will need to set a redirect URL for the OAuth2 process. In this example my app will be running on localhost, port 8000 and the callback endpoint will be %%callback%% . You can use whichever URL fits your setup and can even add more than one. Here’s what my setup look like:

Once that’s done, you should be able to finalise the app creation at the bottom of the screen:

After the app is created you should be able to retrieve the application’s credentials in the dedicated part of the page:

Option 1 - Writing an app able to retrieve information from Hubspot
The app will be written in Python for this example and we will use FastAPI as the framework to build it. Then we will use %%requests%% for generating and sending HTTP requests and finally we will use %%python-dotenv%% for loading environnement variables from our .env files.
First step: Starting the OAuth2 process
The start is fairly simple:
Creating the app object
Then we need to add an endpoint to receive the authentication request from a client willing to use the app. Let’s call this endpoint %%auth%%. This endpoint will start the OAuth2 flow. To do so, it will first create the state from a random concatenation of ascii characters. Then it will generate the HTTP request from the data stored in our environnement variables. Finally, it will send the request store the state in app and follow the received redirect URL. This URL should be the one we provided in the request so another endpoint.
Let’s start by loading the environnement variables
from dotenv import load_dotenv
from fastapi import FastAPI

load_dotenv()
app = FastAPI()
Loading the .env file
Then we can start writing the endpoint functionality. We will need to import %%RedirectResponse%% from %%fastapi.responses%% for the return value.
from fastapi.responses import RedirectResponse

@app.get("/auth")
def get_auth():
	"""Start OAuth2 process"""
	state = generate_state()
	response = requests.get(
		    f"{os.getenv('HUBSPOT_URL')}/oauth/authorize?"
        f"client_id={os.getenv('HUBSPOT_CLIENT_ID')}&"
        f"scope={os.getenv('HUBSPOT_SCOPE')}&"
        f"redirect_uri={os.getenv('HUBSPOT_REDIRECT_URI')}&"
        f"state={state}"
	)
	app.state = state
	return RedirectResponse(response.url)
First implementation of the /auth endpoint
First we generate the state that will be used to verify the request we receive in the second endpoint actually comes from our app. This is generated through concatenating ascii upper and lower case letters with the following code:
import random
import string

def generate_state():
    """Generates random string of letters to use for auth"""
    return "".join(random.choices(string.ascii_letters, k=15))
Random state generation
Then we retrieve the base Hubspot URL in the %%HUBSPOT_URL%% environment variable to which we append /oauth/authorize for pointing to Hubspot’s oauth2 entrypoint. Then it’s a matter of assembling the necessary information as query parameters of the request:
%%client_id%%: from%%HUBSPOT_CLIENT_ID%%%%scope%%: from%%HUBSPOT_SCOPE%%%%redirect_uri%%: from%%HUBSPOT_REDIRECT_URI%%%%state%%: which has been generated just prior
And already we hit an issue with our naive implementation: scopes for Hubspot are space separated which doesn’t play nice with url encoding. So let’s add proper encoding for our parameters. To do so we will use the quote function provided by %%urllib.parse%%:
from fastapi.responses import RedirectResponse
from urllib.parse import quote

@app.get("/auth")
def get_auth():
	"""Start OAuth2 process"""
	state = generate_state()
	response = requests.get(
        f"{os.getenv('HUBSPOT_URL')}/oauth/authorize?"
        f"client_id={quote(os.getenv('HUBSPOT_CLIENT_ID'))}&"
        f"scope={quote(os.getenv('HUBSPOT_SCOPE'))}&"
        f"redirect_uri={quote(os.getenv('HUBSPOT_REDIRECT_URI'))}&"
        f"state={quote(state)}"
	)
	app.state = state
	return RedirectResponse(redirect.url)
Final /auth endpoint
First step done! Now onto the redirect endpoint.
Step 2: Retrieving the access and refresh tokens
That endpoint will be responsible of finishing the OAuth2 process by retrieving the access and refresh tokens. For this example this endpoint will be called %%/callback%%. In this step, we will have to validate that the state received does match the one we expected, retrieve the code provided by Hubspot and finally send a %%POST%% request to the dedicated Hubspot token url to retrieve our tokens.
For this new request we will have to build a payload and send it as form encoded data. Luckily requests takes care of setting the proper headers for that if we provided the payload in a correct format. This time we want to return the data under the JSON format, so we will need to import %%JSONResponse%% from %%fastapi.responses%%.
Callback endpoint implementation
First we check that the received state is the one expected: FastAPI automatically parses the received request for us and translates the %%state%% query parameter we received into the %%state%% variable. Then it’s a matter of checking whether %%app.state%% and %%state%% are the same.
Next step is building the payload. For %%requests%% to set headers properly this payload should be set as a Python dictionary and contain the following information:
%%grant_type%%: This is a constant that should be set to%%authorization_code%%%%client_id%%: Hubspot client ID from%%HUBSPOT_CLIENT_ID%%environment variable%%client_secret%%: Hubspot client secret from%%HUBSPOT_CLIENT_SECRET%%environment variable%%redirect_uri%%: Our redirect_uri from%%HUBSPOT_REDIRECT_URI%%environment variable%%code%%: the code received in the response to the previous request
Then we send this payload to Hubspot’s token URL retrieved %%HUBSPOT_TOKEN_URL%% environment variable. The response to this request will be in the following format:
Hubspot’s token endpoint response
In this simple example we will not automatically refresh the token on expiry nor store this token. We will simply return it to the user to store and reuse himself. However, the storage and automatic refresh of these tokens is not trivial as they should be securely stored (ciphering) and not refreshed too often as that would impact performances of your app.
Second step is done!
Bonus step: Refreshing the access token
We will now add an endpoint for the user to be able to use his %%refresh_token%% to get a new valid %%access_token%%. This endpoint is very similar to the previous one, so I will only cover the differences here.
Endpoint for token renewal
For this endpoint, we will require the user to provide his %%refresh_token%% as a query parameter to this endpoint. We will then build the payload for Hubspot’s token endpoint as done previously, with the following differences:
%%grant_type%%: It is still a constant but must be set to %%refresh_token%% this time%%code%%: it is not required and we wouldn’t be able to provide it, so it is removed%%refresh_token%%: the refresh token provided by the user
We receive here the same response model as for the first negotiation of tokens and again we only return the newly generated access and refresh tokens.
Final step: Retrieving data from Hubspot
Onto the final step: data retrieval. Now that we have our %%access_token%% we can finally access Hubspot’s API to retrieve some data. In this example we will retrieve the contacts stored in our company, both individuals and companies. For Hubspot to authorise access to this data, we previously set the app’s scope which we also used in the token negotiation. Now we need to prove we have access by providing this token in the request. For Hubspot, that is done through the request’s headers. The headers should contain the following one:
http
Copy code
{
	"Authorization: Bearer <access_token>"
}
Then we have to make the proper request on the designated endpoint(s). The data we want to retrieve is located in 2 different endpoints on Hubspot’s side: %%/companies%% and %%/contacts%%. We will need to do 2 requests to retrieve the data we want.
For this example the endpoint on our app will be named %%/contacts%%.
@app.get("/contacts")
def get_contacts(request: Request, token: str):
    """Retrieves companies and individuals (i.e. clients, prospects and suppliers) from Hubspot"""
    headers = {
        "Authorization": f"Bearer {token}",
    }
    response = requests.get(
        f"{os.getenv('HUBSPOT_API_URL')}/companies", headers=headers
    )
    contacts = response.json().get("results", [])
    response = requests.get(f"{os.getenv('HUBSPOT_API_URL')}/contacts", headers=headers)
    contacts.extend(response.json().get("results", []))
    return JSONResponse(contacts)
This endpoint will require the user to provide his %%access_token%% as a query parameter to this endpoint. We then build the header as described previously. For %%requests%%, headers are provided in the form of a dictionary. Finally, we make the %%GET%% requests on the two endpoints of interest and store all data in a list that we then return as a JSON response.
Conclusion
As we have seen in this section, setting up your integration takes quite some time as even after retrieving credentials from Hubspot, we had to setup the authentication process to retrieve usable secrets. We skipped over the difficulties of storing and refreshing these access by letting the user deal with keeping the %%access_token%% and refreshing it as he needs. However, it’s not the best user experience as a user would either need to keep track of the expiry time of their token or notice the authentication failure during data retrieval to know they have to refresh their accesses. In contrast, every step of the integration is modifiable and customisable to best suit our use-case which can be a deciding factor.
Overall this is a perfect solution for a product that would require few integrations and is willing to deal with the maintenance and time consuming development to the benefit of having a perfectly tailored integration.
Option 2 - Using Chift's Unified APIs
Let’s try and build the same scope but with Chift this time. The code presented here is not directly integrated to our app but I’ll describe how it could be at the end of this section.
For building the integration with Chift, we will need:
- A Chift account with the Hubspot integration enabled
Setting OAuth2 parameters
Once logged into your Chift account, navigate to the Hubspot configuration.
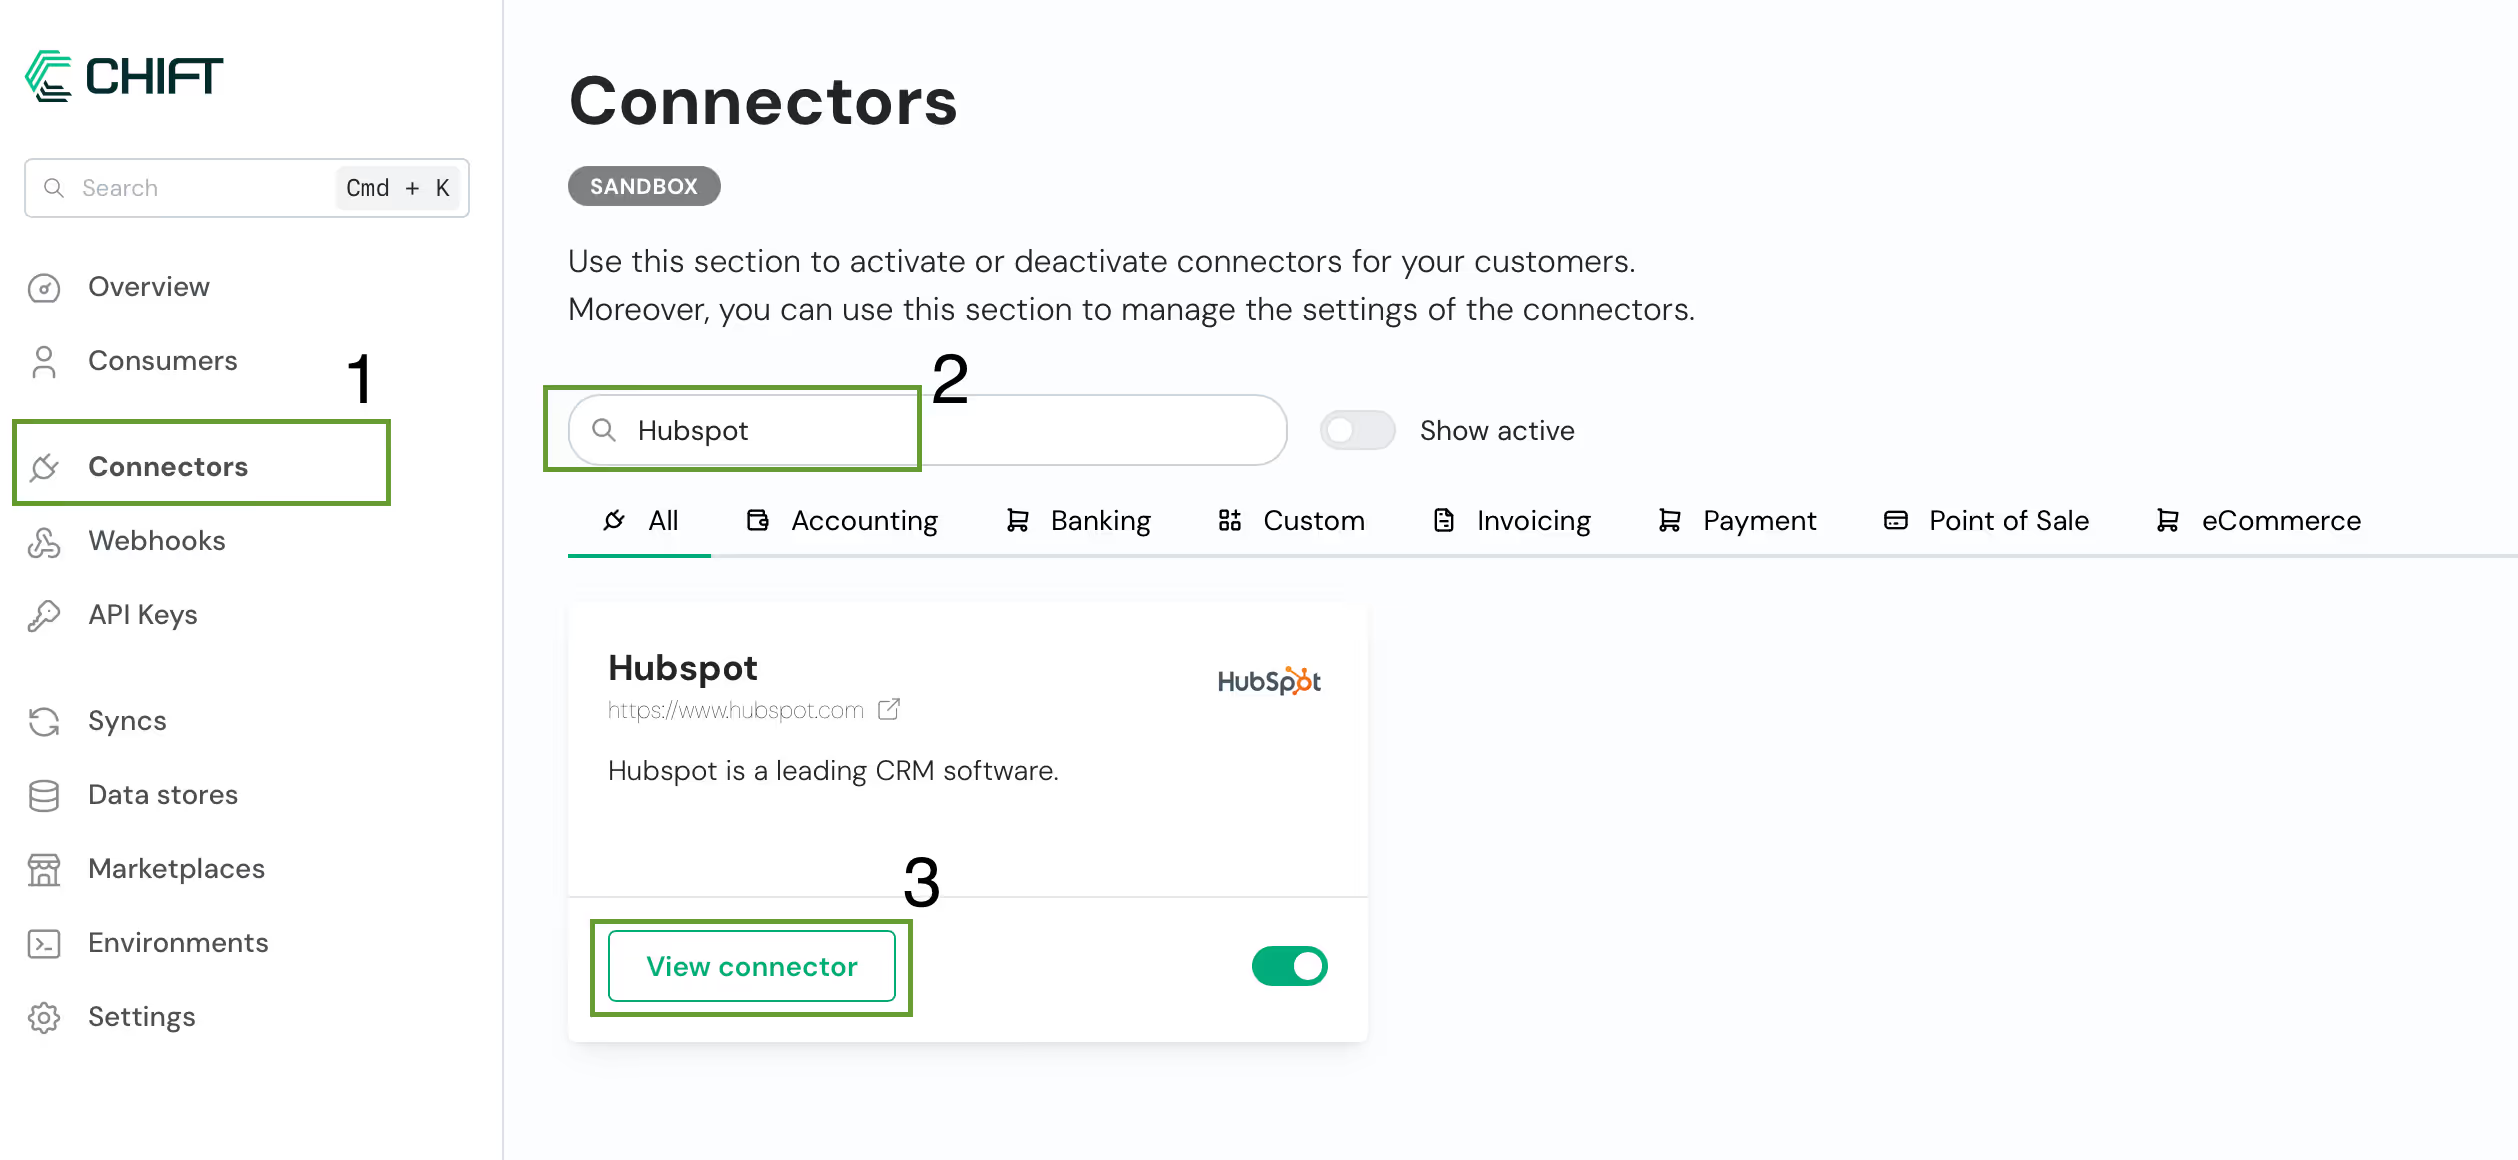
Then on the connector configuration page, you can input the %%client_id%% and %%client_secret%% we retrieved from your Hubspot application.

And you’re all set!
Creating a consumer
After setting up the OAuth2 information, navigate to the consumers page.
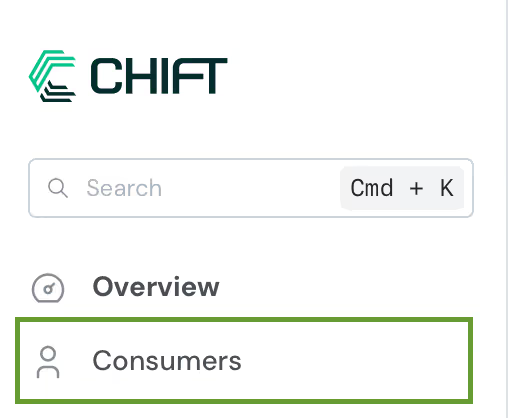
Then add a new one named however you like.
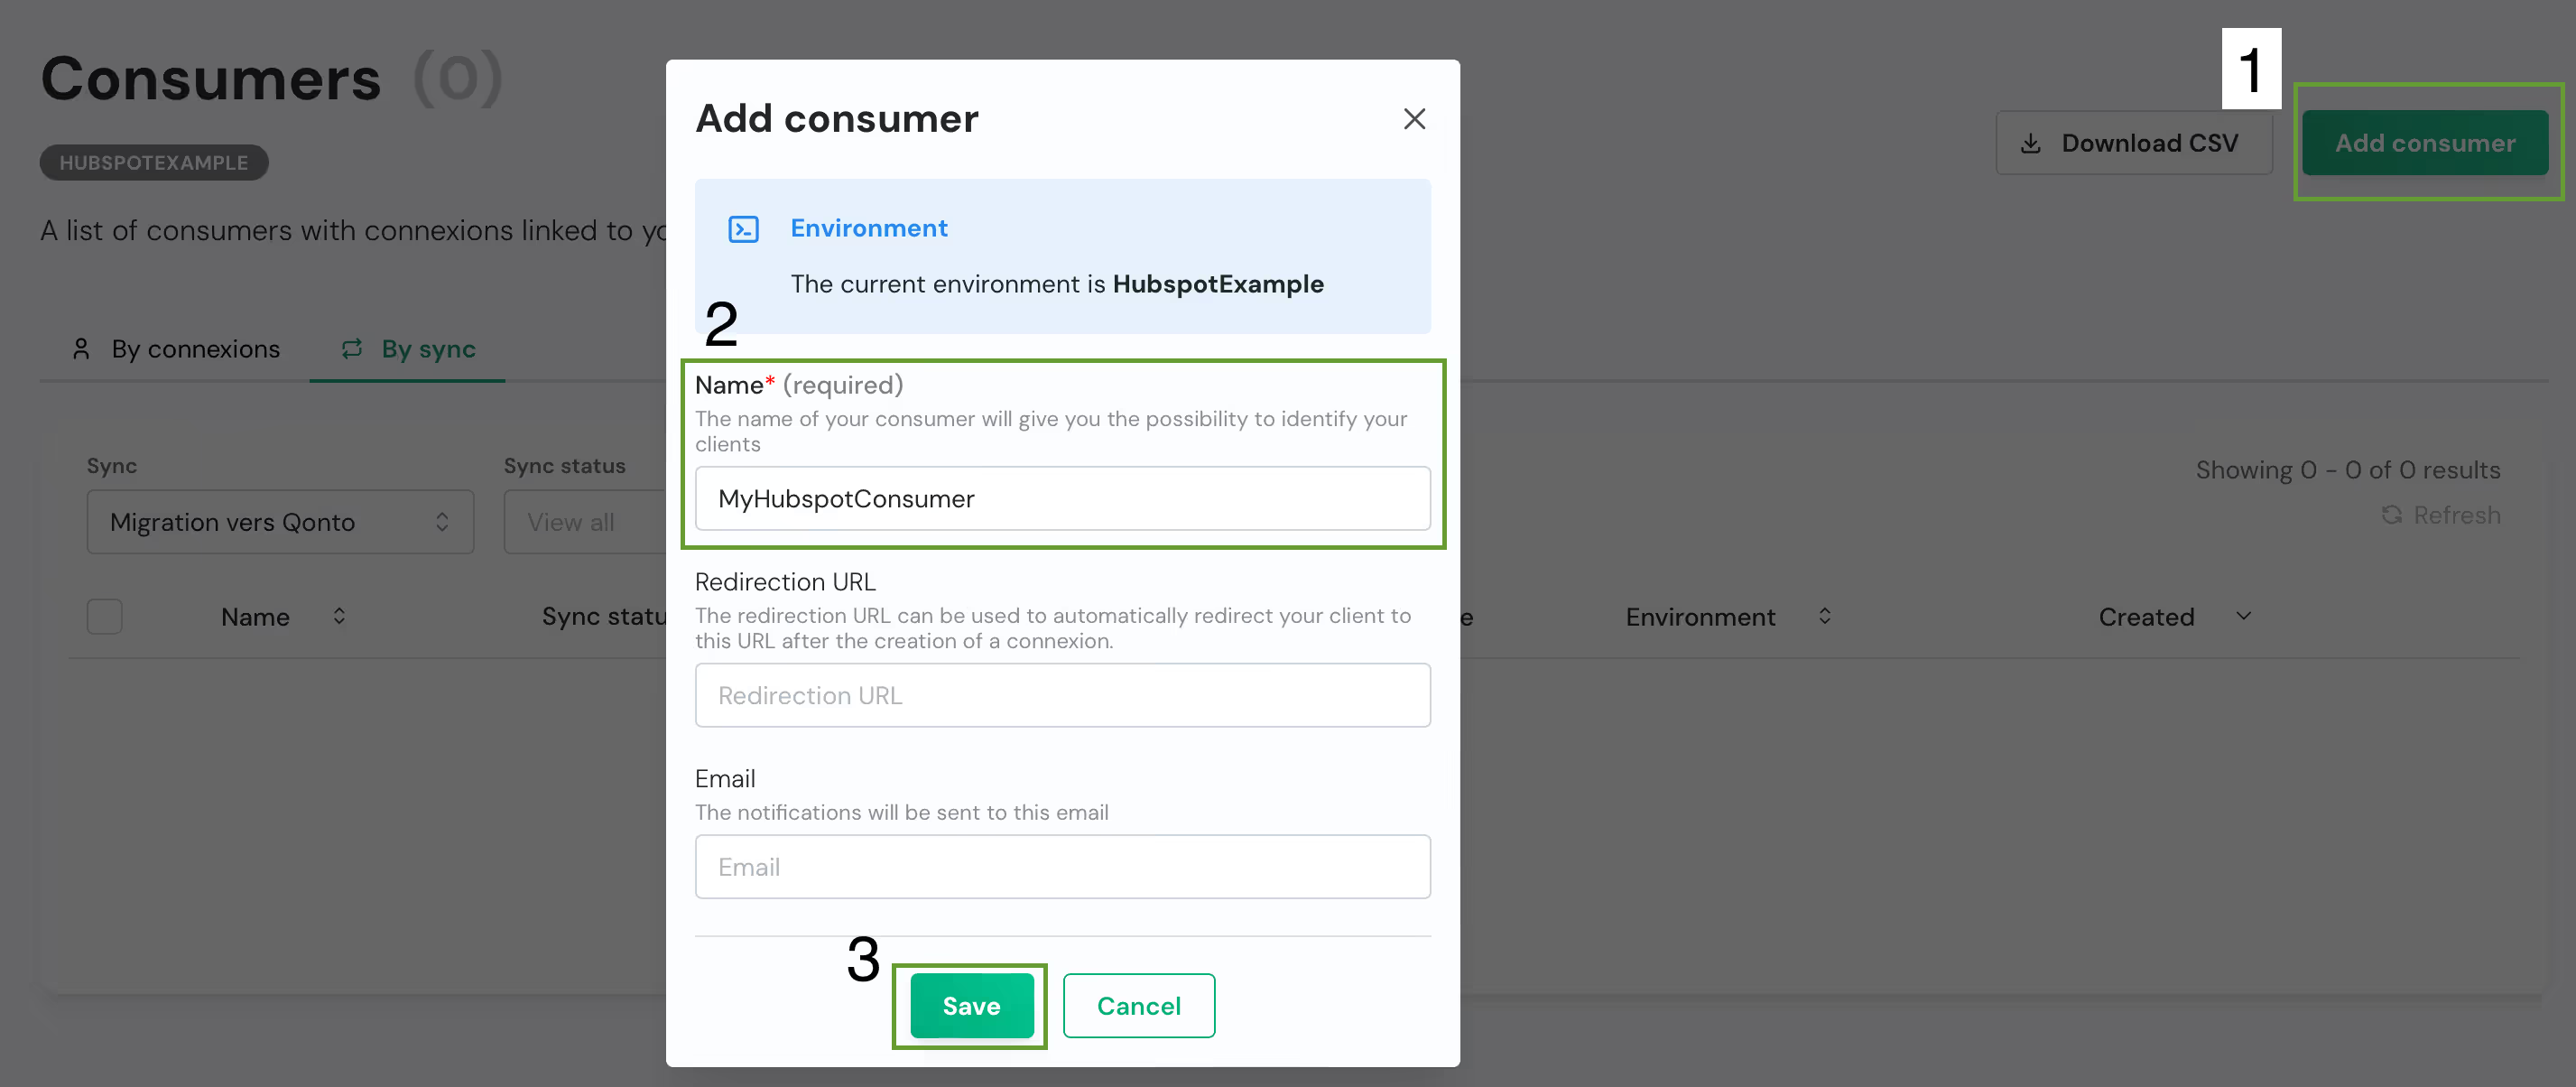
Make sure to store the consumer’s ID in your .env file and then you can follow the consumer link to complete the OAuth2 process.
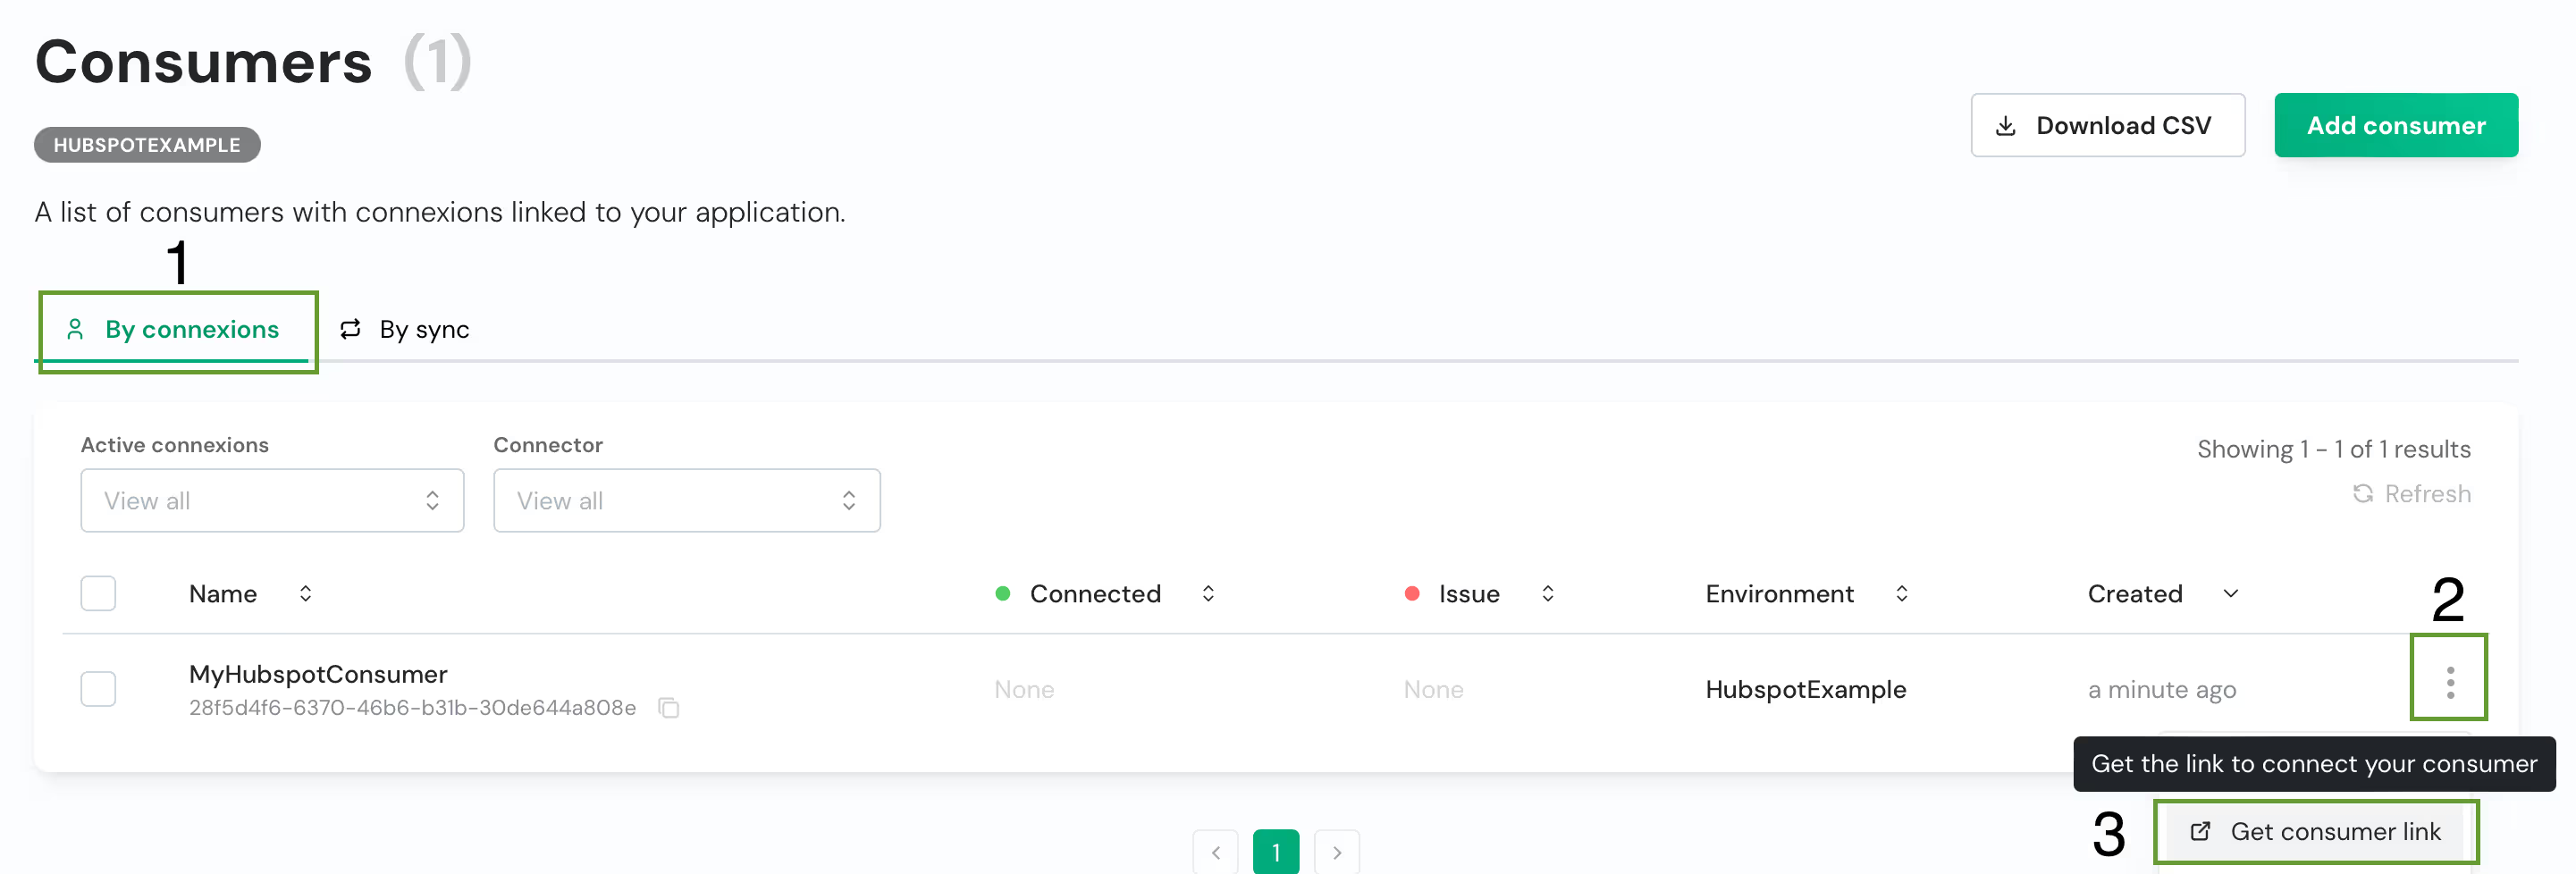
Then select "Connect" in the connector selection page. You should be prompted to give a name to the connexion. This value can take any arbitrary value, in my case it will be %%MyConnection%% then click "Authorize" and that will start the OAuth2 process to retrieve the %%access_token%%.
Congratulations, only one step to go to be able to use the API!
Creating an API key
To create an API key, you will have to navigate to the dedicated section in Chift’s platform. On that page, you can retrieve your account %%ID%% as well, so make sure to do so and add it to your %%.env%% file.

From there you can give your API key a name and limit it to a specific consumer if you so desire.
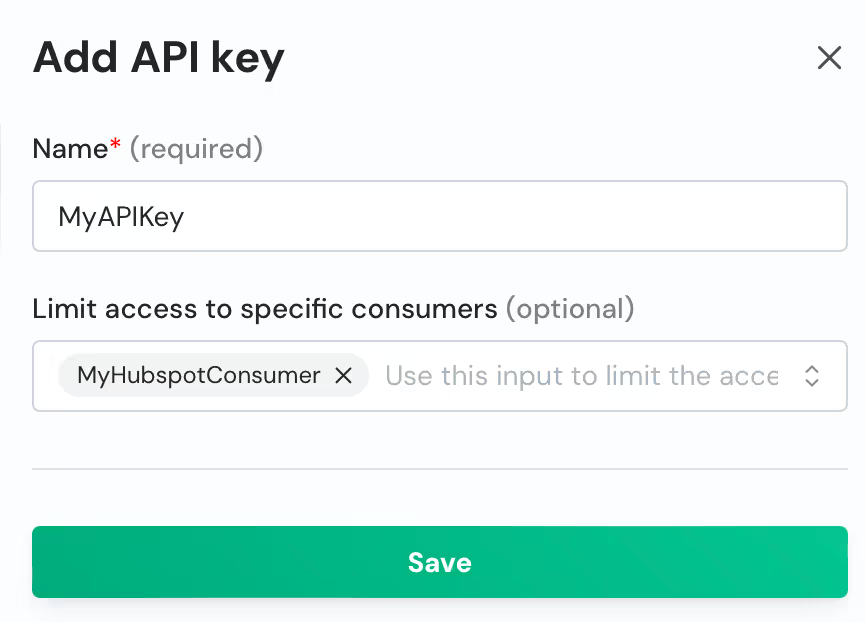
And voilà! You can now make sure to save all the relevant information in a secure place like a password manager and for the task at hand, in the %%.env%% file.
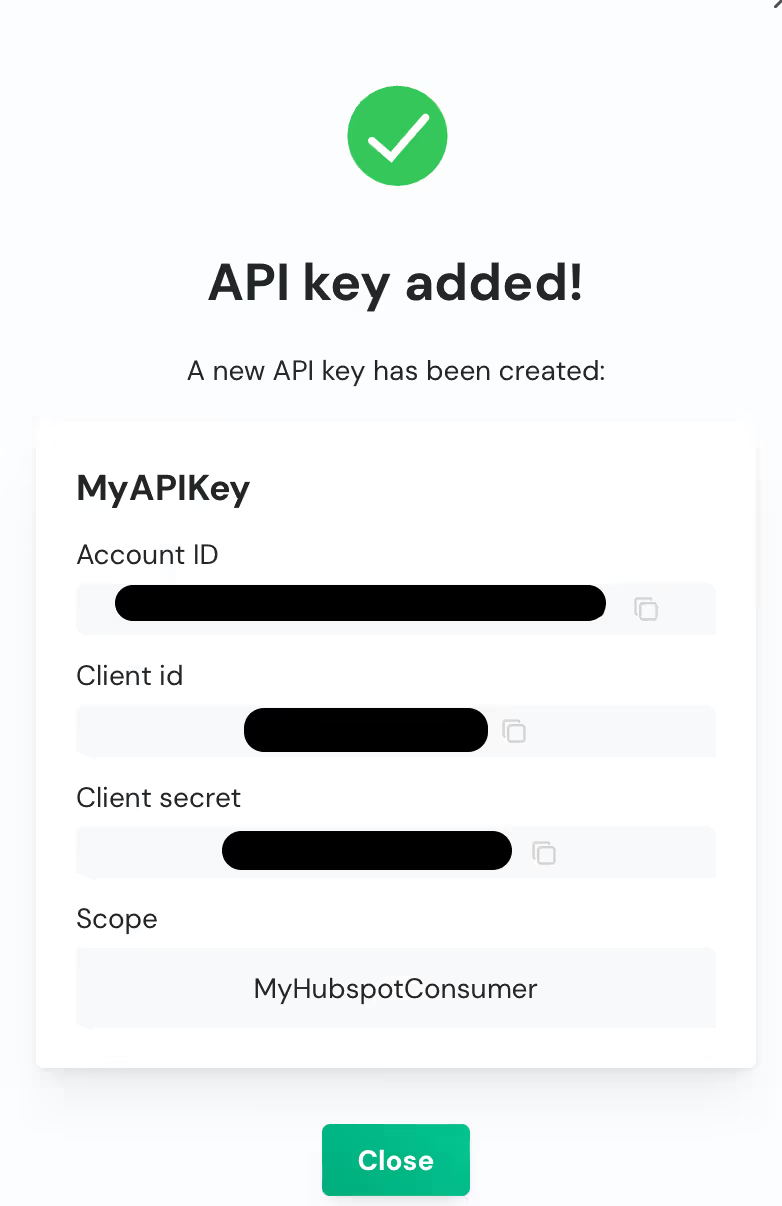
Now that we have all the information we need, we can move on to the code.
Retrieving contacts with Chift’s SDK
For this we will rely on the %%python-dotenv%% library again to populate the environment with the configuration stored in our %%.env%% file and %%chift%% which is the python SDK for Chift’s application.
First thing to do when working with the SDK, is to create a client that will be providing the authentication for the other methods. So let’s get started:
from chift.api.client import ChiftClient

def get_client():
    return ChiftClient(
        client_id=os.getenv("CHIFT_CLIENT_ID"),
        client_secret=os.getenv("CHIFT_CLIENT_SECRET"),
        account_id=os.getenv("CHIFT_ACCOUNT_ID"),
        url_base=os.getenv("CHIFT_URL"),
    )
Creating a ChiftClient object
For creating a %%ChiftClient%%, you will need the following information:
%%client_id%%: client ID provided during the API key creation%%client_secret%%: client secret provided during the API key creation%%account_id%%: account ID provided during the API key creation but also available in the API keys page%%url_base%%: url Chift’s application API.%%max_retries%%(optional): maximum number of retries for each request, defaults to 3.
Now that we have a client, we can use it to retrieve the abstraction of the consumer we created in the platform earlier.
from chift.api.client import ChiftClient
from chift.openapi.models import Consumer

def get_consumer(client: ChiftClient, consumer_id: str) -> Consumer:
    return chift.Consumer.get(consumer_id, client)
Retrieving a consumer with Chift’s SDK
And now we can use this abstraction to access the data the consumer has access to. In our example, we wanted to retrieve all the contacts that are available in our Hubspot instance. With Chift’s SDK, it is a one-liner:
consumer.invoicing.Contact.all(client=client)
So let’s assemble the parts we have to retrieve Hubspot’s contactRetrieving contacts with Chift’s SDK
And.. that’s it! With only a few lines of code we were able to cover the scope we had with our application approach. The added benefit here is that we don’t have to take care of storing the authentication information of Hubspot nor rotating the access_token ourselves: it’s all taken care of by Chift.
Bonus: Adding Chift’s code to the app
This is not included in the repository containing the code, but if you would like to add the code written here in your application, it would be as easy as porting the utils functions %%get_client%% and %%get_consumer%% where you can access them in your application’s code. Then move the code in the %%main%% function to a new dedicated endpoint such as:
@app.get("/contacts-chift")def contacts_with_chift():
client = get_client()
consumer = get_consumer(client, os.getenv("CHIFT_CONSUMER_ID"))
return consumer.invoicing.Contact.all(client=client)
Application endpoint using Chift’s integration
Conclusion
The attentive reader has probably noticed that most of this section was setting up things on Chift’s platform which can be done in a few clicks at every step and very little actual code being written. That is one of the benefits of using such a platform for managing your integrations: much less code needed to achieve the same outcome. For the sake of simplicity, the consumer setup has been done through the interface but it could have been done through the SDK as well.
This solution is best suited for fast-growing solutions that rely on multiple integrations, or plan to do so. It is also perfect when writing and maintaining integrations is not the core of the solution but a means to an end. In short, any solution looking into supporting many integrations or not having the resources to develop and maintain them should consider using a unified API provider.
What to take from this comparison
In this article we have exposed two different approaches to integrations, the first one being writing your own and the second one, using a unified API provider.
The first approach has the benefit of customisation, writing your integration to work exactly as you want it to. But it also comes with the friction of doing something yourself: dealing with secret storage and refreshing your accesses for instances. And that’s only scratching the surface: this solution is hard to scale as it necessitates work to be done for each and every integration you want your application to have. It also takes time to maintain as any change in the API you are using could result in your application breaking.
If you chose to go for the second option, you can alleviate most of these pain points: secret and accesses is handled by the unified API provider, the API you’re using for integrations is one and the same for all your integrations and the maintenance then becomes minimal, as you only have to worry about that one API instead of one per integration. And while you do have to configure the platform, it’s only a “first setup” kind of pain point instead of a repeating one for all of your integrations.
If you want to have your mind at peace when thinking about integrations, gain a competitive edge and position yourself for success, choose Chift's Unified APIs. Reach out to our team for a demo.

.webp)
.webp)
.webp)


.webp)





.avif)


